In this post I will try to outline how to use Mqtt Lens an useful chrome extension developed by Sanndro which can help you test the installation done as per my previous post Mosquitto broker installation. 
MQTT Lens is a Chrome Extension available to use along with Chrome Browser for the purpose of connecting to a MQTT Broker and test with publish/subscribe scenarios of MQTT Messages. This is a very useful tool to check the connectivity to the MQTT broker and to check various scenarios of publishing and subscribing messages. I have tested this tool myself with Mosquitto and RabbitMQ+Mqtt Plug in scenarios.
In this post we will go through step by step on how to install and configure Mqtt Lens and use it 10 simple steps.
Step 1: Make sure you have chrome browser installed and have internet connectivity.
Step 2: You can click the URL here to go to the extension or chrome app instantly alternatively you can approach the method outline in the the github page of sandro-k (This post will give notes based on the URL provided for chrome extension installation)
Step 3: Once you have the extension installed by clicking the Install or Launch App as given in this blog post
Step 4: Once you have installed it navigate to Chrome App Launcher which would probably in the Windows Task bar as shown in the picture on to your right.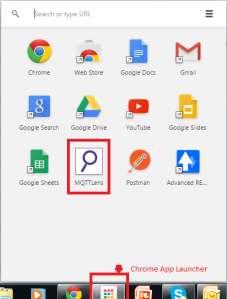
Step 5: Once you click the Mqtt Lens Icon from the chrome app launcher you will see the following screen.

Step 6: Before you add the connection ensure the broker is running. For this you might need the information about the broker and make sure the broker service is already running in the Windows with port 1883. You can check this using netstat -an.
Step 7: Now you need to add the Connection. For this you might need the IP address or Hostname, in this example I have provided the IP Address which will be most important parameter and click create connection.

Step 8: Now once you click create connection you will be taken to the screen where in you will need to provide the publish and subscribe information to test the broker or to work with the broker.

Step 9: In the above example you could realize that the # symbol in the Subscribe input box helps you to subscribe to all the content available in the queue to the available. You can look at the data in both Json format or plain text message
Step 10: Information on the message can be obtained by clicking the information button on the right hand side of the message. Screenshot given below:

You can add more connections and play with Mqtt Messages. Thanks. Please share your view and comments on this post.

Leave a comment